Enable hardware video decoding on Electron 12

I am working on an Electron app running on Ubuntu 20 with Intel J1900 CPU. The CPU isn’t that powerful to play video and hardware accelerated video decoding can obviously help to reduce CPU usage during video play.

Unfortunately enabling hardware acceleration on Linux is not by default and the way of enabling it also keep changing. I have been using the methods from this post and it just didn’t work until recently I saw this discussion and the release of Electron 12 built with Chromium 89.

Note: The following works in Electron 12 built with Chromium 89, and won’t work on Electron 11.

In summary, to enable hardware video decoding on Ubuntu 20, make sure the following are done:

  1. Drivers are properly installed. There are a lot of posts giving guide on this already. To verify, use player like mpv and take note on the console output.
  2. Run Electron 12 with video decoding features enable. See my example code below.
  3. Check chrome://gpu page, check video decoding is hardware accelerated. Also check the bottom of the page which list out video acceleration information. If the section is empty, probably it is not working.
  4. Play some videos in Electron and check hardware decoder is used by the media player. Checking can be done in DevTools, More tools menu, Media tab. Ensure the videos codec are supported by video acceleration.
// Example code to enable video decoding
// Install Electron 12 with `npm install --save-dev electron@12`

const { app, BrowserWindow } = require('electron')

function createWindow () {
  const win = new BrowserWindow({
  })
  win.loadFile('chrome://gpou')
}

if (process.platform === 'linux') {
  app.commandLine.appendSwitch('enable-features', 'VaapiVideoDecoder')
  // This switch is not really for video decoding I enabled for smoother UI
  app.commandLine.appendSwitch('enable-gpu-rasterization')

}

app.on('window-all-closed', () => {
  if (process.platform !== 'darwin') {
    app.quit()
  }
})

app.on('activate', () => {
  if (BrowserWindow.getAllWindows().length === 0) {
    createWindow()
  }
})

app.whenReady().then(createWindow)
Life Balance

Almost 2 years I haven’t write any post here but I did have some pages updated during the course.

At the beginning of the year 2020, I started to look for new job because I deserve better when my former colleagues who had similar level and experience has a better package than I did. Unfortunately the COVID-19 and my lack of programming experience in modern front-end and enterprise back-end programming language made my job hunting difficult.

With more time staying at home under COVID-19, I got more time to work on something else. Though may not be useful in my job hunting, I tried to learn more in coding. native-promise-util and mysql-parser are 2 Node.js modules which I wrote during my free time but needed in the project which I was worked on in office. This also served as my starting point for coding in TypeScript.

On the other hand, I also tried to rewrite jQuery front-end with Vue.js 2 in my other coding exercise. At least I now got a taste of how front-end development is but obviously that will not be enough.

Anyway time is limited, and there were tons of things we want to accomplished in our short life. Seeking the point of balance is not easy, same as building a system, and I am still on the way to seeking the balance point.

Auto-Java-Updater 1.0 for Windows is Published!

I don’t really have a good impression on Oracle product, though it is truth that their product perform well, they are just less user orientated.

So this time, I am having trouble with updating Java Runtime Environment, or JRE in short. It has been a long problem. I got several desktops in my company which require JRE for their work. But after a month or two, the users will complaint to me that they cannot use their application and show me a screenshot which is actually a pop up saying JRE is out of date.

Oracle never provided an automatic update mechanism for JRE, and because the user doesn’t have administrator right, they can’t perform their installation on their on. At the end of the day, I have to update the JRE on their desktop, one by one.

So finally today I am looking for solution to the problem, and found this, a batch script to update the Java. I tried, and found a few bugs and issues. So I decided to fork it and create my own one, which is the birth of my own Auto-Java-Updater.

You may visit the project page here or download the script at the project release page here.

Anyway, my day has gone to make this script, and hopefully saving me the trouble onward until JRE 8 is obsoleted.

Visual Studio Code Zip / Portable Version for Windows

Recently I was given an exercise to work on Node.js. A few years ago I was using Aptana Studio on Node.js. So after these few years I guess there should have some IDE or editor available for Node.js. So I ended up found Visual Studio Code and Atom.

I tried both Visual Studio Code and Atom, and I choose Visual Studio Code at this moment because the autocomplete suggest is much more better than Atom.

For software that I use, I usually prefer portable version. I found someone has made one, but I don’t like unofficial release. I looked again and lucky found a post here which mentioned that there is a portable version of Visual Studio Code.

After further checking, it is actually a zip version and officially the download link is located deep inside the FAQ section of Visual Studio Code.

Anyway for those who like no installer version, below is the link to download it directly.

http://code.visualstudio.com/docs?dv=winzip

Edit 2016-08-13: Finally they have provided the Zip archive download link in their download page.

Reading UTF File with BOM to UTF-8 Encoded std::string in C++11 on Windows

I got a task from boss and during the task I need to write a C++ function to read a text file into UTF-8 encoded string. I can’t believe this easy task in high level language like VB.NET cost me 2 days to figure the solution out. Some solutions use libraries like UTF8-CPP or ICU, while some use Windows API. These ways works but I don’t quite like them because:

  1. Usability, some solutions work good for most characters but failed to handle non-BMP characters
  2. Portability, we are foreseeing our code will be migrated to Linux, use of Windows API means adding work to our migration work in the future
  3. Dependency, I don’t want to depend on third-party library, especially the C++ function later will integrated with the program which only depend on very few third-party library.

Surprisingly there is not much solution that I am satisfied from the Internet, but good that at the end I still able to figure the code out. It still used one Windows API function though, but it is much easier to port to Linux already than ten functions. Anyway here it is:

// Reading ASCII, UTF-8, UTF-16LE, UTF-16BE with auto BOM detection using C++11 on Windows platform
// Code tested on Microsoft Visual Studio 2013 on Windows 7
// Part of the code is referencing http://cfc.kizzx2.com/index.php/reading-a-unicode-utf16-file-in-windows-c/

#include <stdio.h>
#include <tchar.h>
#include <string>
#include <fstream>
#include <sstream>
#include <locale>
#include <codecvt>
#include <iostream>
#include <io.h>
#include <fcntl.h>

#define TEXT_FILE_PATH      "D:\\test.txt"
#define ENCODING_ASCII      0
#define ENCODING_UTF8       1
#define ENCODING_UTF16LE    2
#define ENCODING_UTF16BE    3

std::string readFile(std::string path)
{
	std::string result;
	std::ifstream ifs(path.c_str(), std::ios::binary);
	std::stringstream ss;
	int encoding = ENCODING_ASCII;

	if (!ifs.is_open()) {
		// Unable to read file
		result.clear();
		return result;
	}
	else if (ifs.eof()) {
		result.clear();
	}
	else {
		int ch1 = ifs.get();
		int ch2 = ifs.get();
		if (ch1 == 0xff && ch2 == 0xfe) {
			// The file contains UTF-16LE BOM
			encoding = ENCODING_UTF16LE;
		}
		else if (ch1 == 0xfe && ch2 == 0xff) {
			// The file contains UTF-16BE BOM
			encoding = ENCODING_UTF16BE;
		}
		else {
			int ch3 = ifs.get();
			if (ch1 == 0xef && ch2 == 0xbb && ch3 == 0xbf) {
				// The file contains UTF-8 BOM
				encoding = ENCODING_UTF8;
			}
			else {
				// The file does not have BOM
				encoding = ENCODING_ASCII;
				ifs.seekg(0);
			}
		}
	}
	ss << ifs.rdbuf() << '';
	if (encoding == ENCODING_UTF16LE) {
		std::wstring_convert<std::codecvt_utf8_utf16<wchar_t>> utfconv;
		result = utfconv.to_bytes(std::wstring((wchar_t *)ss.str().c_str()));
	}
	else if (encoding == ENCODING_UTF16BE) {
		std::string src = ss.str();
		std::string dst = src;
		// Using Windows API
		_swab(&src[0u], &dst[0u], src.size() + 1);
		std::wstring_convert<std::codecvt_utf8_utf16<wchar_t>> utfconv;
		result = utfconv.to_bytes(std::wstring((wchar_t *)dst.c_str()));
	}
	else if (encoding == ENCODING_UTF8) {
		result = ss.str();
	}
	else {
		result = ss.str();
	}
	return result;
}

You can also find the above code at https://gist.github.com/VeryCrazyDog/c20b2cb83896e9975d22

Building Ncat Portable for Windows

Background

I used to use telnet for testing if the firewall working properly in the office. Telnet is good for simple test, but when comes to testing a large number of destination IP and ports it will be very time consuming. After searching on the Internet I found Netcat, a tool for testing connection. It is build-in in most Linux OS but not on Windows. So I found Ncat here as part of the Nmap for Windows by nmap.org, but too bad that it won’t execute on some Windows as it requires Microsoft Visual C++ Redistributable Package installed.

A Ncat portable is an alternative, but the website only provided a beta version of Ncat 5.59BETA1, and require you to compile your own if you would like a newer version.

They did provide a documentation on how to compile Ncat with static linking library, but if you follow the steps you will encounter a few problems which you have to troubleshoot yourselves.

So here is my steps on compiling Ncat portable after I had gone through all the trouble.If you are someone who can edit the documentation on secwiki.org, please do that for me as I don’t want to get an extra account for just editing the document :)

If you want to avoid the trouble to compile, you can download the Ncat which I compiled here, however use it at your own risk as I might have inject some malware inside :)

Building Ncat Portable for Windows

Environment

The following steps has been tested using the following environment:

Steps

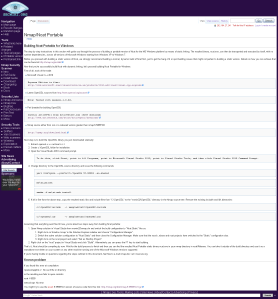
  1. First, follow all steps on the original documentation at https://secwiki.org/w/Nmap/Ncat_Portable till you copied the resulted static libs and include files from “C:\OpenSSL” to the “mswin32\OpenSSL” directory in the Nmap source tree in step 5. Below is a screenshot of the original documentation in case it is edited at the time you read this article.
    Building Ncat Portable
  2. Assuming that everything went fine till now, you’re about 7 steps away from building Ncat portable.
    1. Open Nmap solution in Visual Studio from mswin32\nmap.sln and switch the build configuration to “Ncat Static” like so:
      1. Right click on Solution “nmap” in the Solution Explorer sidebar and choose “Configuration Manager“.
      2. Switch the active solution configuration to “Ncat Static“. Check the “Build” check box for project “liblua“. Make sure that the nsock, nbase and ncat projects have switched to the “Static” configuration also. Then close the “Configuration Manager”.
      3. Right click on the ncat project and select “Set as StartUp Project“.
    2. Right click on the “nsock” project in Visual Studio and click “Properties“. In “Configuration Properties” > “General” > “C/C++” > “General“, in “Additional Include Directories“, add path “..\mswin32\OpenSSL\include
    3. Right click on the “ncat” project in Visual Studio and click “Properties“. In “Configuration Properties” > “General” > “C/C++” > “General“, in “Additional Include Directories“, add path “..\mswin32\OpenSSL\include” and “..\liblua
    4. Right click on the “ncat” project in Visual Studio and click “Properties“. In “Configuration Properties” > “General” > “Linker” > “General“, in “Additional Library Directories“, add path “..\mswin32\OpenSSL\lib
    5. Expand the “ncat” project, double click the file “ncat_ssl.c” and comment out the line “#include <openssl/applink.c>
    6. Right click on the “liblua” project in Visual Studio and click “Properties“. In “Configuration Properties” > “General” > “C/C++” > “Code Generation“, set “Runtime Library” to “Multi-threaded DLL (/MD)
    7. Right click on the “ncat” project in Visual Studio and click “Build“. Alternatively you can press the F7 key to start building.

Prevent php-cgi.exe the FastCGI Process Exited Unexpectedly on Windows Servers running MS SQL and IIS

Microsoft only loves Microsoft products and always hates the others. Recently I am working on a website using CakePHP. We are using the IIS, PHP, MS SQL configuration and well, things are just getting ugly when PHP access MS SQL database via PDO.

Environment:

  • Windows Server 2012 R2
  • IIS 8.5
  • PHP 5.4 installed via Microsoft Web Platform Installer
  • Microsoft SQL Server 2012
  • CakePHP 2.4 using PDO to connect to MS SQL

Problem:

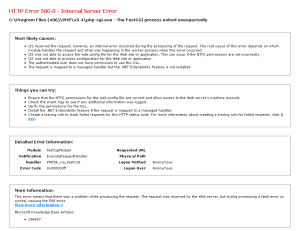
php-cgi.exe crashed for unknown reason which I have completely no idea what was happening.

php-cgi.exe exited unexpectedly

My Solution

After searching on the web, here is what I found:

  1. If php-cgi.exe crashed randomly (and actually alternatively), it is possible that you have turned on persistent connection. According to this post, accessing MS SQL using PDO doesn’t like persistent connection. So just disabled the default on persistent connection in your CakePHP database configuration file.
        public $default = array(
            'datasource' => 'Database/Sqlserver',
            // Persistent connection should not be turned on for MS SQL as it will cause FastCGI to crash
            // https://github.com/cakephp/cakephp/issues/2003
            'persistent' => false,
            'host' => 'localhost',
            'login' => '',
            'password' => '',
            'database' => 'mydb',
            'prefix' => '',
            //'encoding' => 'utf8',
        );
  2. If php-cgi.exe crashed at a particular page, it is easier to trace what’s wrong but still you may not able to find a workaround. In my case, I tried to run stored procedures and php-cgi.exe just crashed by that time! For my case, I just have to use SET NOCOUNT ON to workaround the crash.
    CREATE PROCEDURE [dbo].[sp_my_proc]
    AS
    BEGIN
        SET NOCOUNT ON;
        -- ...
        -- Your code
        -- ...
    END

Creating Command Prompt Shortcut with Specified Environment Path on Windows

Sometimes you might want to have a command prompt with the specified command such as php available, without specified the full path to the executable and without altering the system or user environment variables.

There are several ways to achieve this, and here is the simple way I liked to use.

  1. Make a copy of the Command Prompt shortcut in your start menu
  2. Right click on the new shortcut and click Properties
  3. In the Shortcut tab, append the following content into the Target text box. Make sure you got a space before /k
     /k "set path=%path%;C:\bin\php54"
  4. Replace the part C:\bin\php54 with the path to the folder where your executable files are located

At the end you will have something like this:

Command Prompt Shortcut

Open Video File using omxplayer on Raspberry Pi without Terminal

I was trying to make Raspberry Pi running Raspbian OS to turn it as a media player with can play video without using a keyboard so that it is portable for a trip.

The only software that allow video playback on Raspbian is omxplayer. It is a command line tool and therefore need a keyboard to start playing video. Searched on the Internet and found that it is possible create an application, allowing you to play the video via right clicking the video file and choosing the application to open. However most of scripts included in the Internet are not working on my Raspbian. After a long research I finally figured out a working one.

Later on, I actually found that there other OS such as Raspbmc, OpenELEC which is actually designed turn Raspberry Pi to be a media center and I have another Raspberry Pi for that now. Anyway below are the steps to create applications for video playback on the LXDE desktop environment on Raspbian OS:

  1. Create a file with the following content at /usr/share/applications/omxplayer-hdmi.desktop. This will allow you to hear the sound output to HDMI.
    [Desktop Entry]
    Name=OMXPlayer (HDMI)
    Type=Application
    Categories=AudioVideo;Player;
    Exec=lxterminal --command "sudo omxplayer -r -o hdmi %f"
    Terminal=false
    Icon=/usr/share/icons/nuoveXT2/96x96/categories/applications-multimedia.png
  2. Create a file with the following content at /usr/share/applications/omxplayer-local.desktop. This will allow you to hear the sound output to the 3.5mm audio jack.
    [Desktop Entry]
    Name=OMXPlayer (3.5mm)
    Type=Application
    Categories=AudioVideo;Player;
    Exec=lxterminal --command "sudo omxplayer -r -o local %f"
    Terminal=false
    Icon=/usr/share/icons/nuoveXT2/96x96/categories/applications-multimedia.png

Removing non-essential Files from Visual Basic 2010 Compiled Output

By default the compiled output from Visual Basic 2010 comes with several non-essential files for debugging. If you want to remove them from the output folder, here is the article about it.

Background

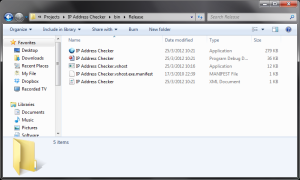
Normally the compiled output will have the following files:

Visual Basic Compiled Output

  • A compiled executable (.exe)
  • A database with debug information (.pdb)
  • A debug executable for debugging purpose (.vshost.exe)
  • A configuration file for the debug executable (.vshost.exe.manifest)
  • A documentation file (.xml)

Most of the time you will only need the compiled executable.

Disable Generating .pdb

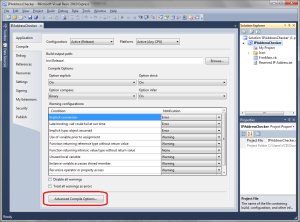
1. Go to project Properties, Compile tab, and click the Advance Compile Options button.

Compile Tab of Project Property

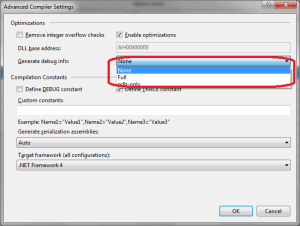
2. In Advanced Compiler Settings dialog, choose None in Generate debug info.

Advanced Compiler Settings

Disable Generating .vshost.exe and .vshost.exe.manifest

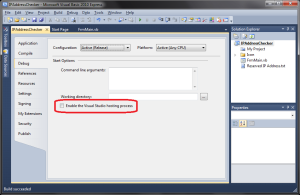
1. Go to project Properties, Debug tab.

2. Uncheck the option Enable the Visual Studio hosting process.

Debug Tab of Project Properties

Disable Generating Documentation File .xml

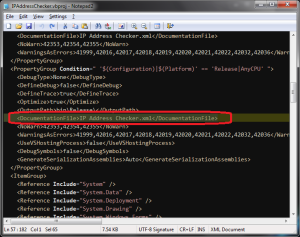
In some version of the Visual Studio there is an option to disable the generation of documentation file in Compile tab of the project Properties. However I couldn’t find this in my Visual Basic 2010 Express and as a result I got to edit the project file using Notepad.

1. Open the Visual Basic Project file .vbproj using text editor.

2. Remove the XML node with tag DocumentationFile.

Visual Basic Project File